
Giant Connect 4!

IMG_9790
It's time for summer family fun - and what says fun more than a giant Connect 4 game!! Any easy building project to do with your kids it can work inside and out, keeps kids busy and builds math and strategy skills. Boom!
MATERIALS
Nail Gun
Screws
Wood Glue
Ruler
Pencil
Hole Saw 6"
1 Sheet 1/4" Plywood - 40"x60"
1 Sheet 1/2" Plywood - 40"x60"
6 pieces of 2"x2"x40" Wood
1"x3"x60" Wood
24" Plywood Round, cut in half
2 Hinges
Velcro dots
20 frisbees divided by 2 colors
Paint

IMG_1719
Lay out 5 frisbees evenly across the 1/2” plywood to figure out spacing. Because frisbees come in different diameters, this will depend on your specific discs. Evenly place the six 2x2’s between frisbees using a yard stick to insure everything is even and mark with a pencil. Make sure that your first and last 2x2 line up with the edge of the plywood.

IMG_1716
Remove frisbees and affix 2x2’s using wood glue and a nail gun or screws.
IMG_1722
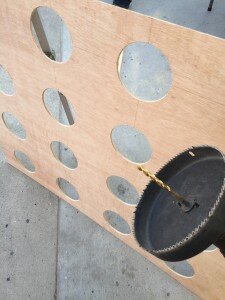
Using your previous placement of frisbees, draw a grid on the 1/4” plywood marking where the center of each frisbee will land. Remember that your frisbees will touch when they are stacked vertically and will have space between them horizontally and make your marks accordingly. Use the hole saw to drill a hole where the center of each frisbee will land.

IMG_1727
Attach 1/4” plywood to the 2x2’s that you previously attached to the 1/2’ plywood using wood glue and a nail gun or screws.

IMG_1723
Create the legs by gluing and nailing two 1x3’s to the center of each half round.

IMG_1726
Attach legs to side of game board using glue and nail gun or screws.
Attach the remaining 1x3 to the bottom of the game board using two hinges on the back and Velcro dots on the front to act as a closure.Now go ahead and Connect 4!