
Sewing and Craft Armoire


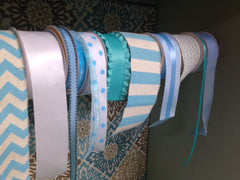
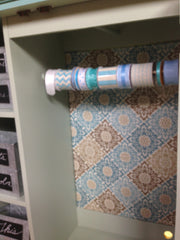
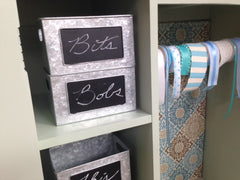
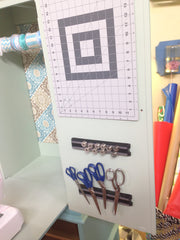
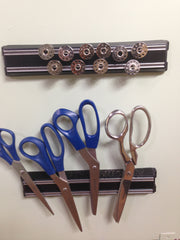


I had an hour a couple of weeks ago to make some headbands for a sewing segment I was filming. It was nap time so I new I had to work fast! By the time I got the sewing machine out of the basement, my notions box out of the closet, the fabric out of the cupboard and got it all set up (okay, and made myself a cup of coffee), I heard the first waking yawns from the twins and I knew my window of opportunity had closed. This just isn't right, I'm sure I'm not the only one who needs a place to keep everything handy yet out of sight. When I went to look at options on line, I found some great crafting and sewing cabinets, but the ones I wanted were almost $1000 - uh, yeah, I don't think so. So, this project was born. How to create a sewing or craft armoire from a second hand cabinet.MATERIALS- Armoire (it's handy to pick one that has an inner base or shelf that is about desk height, check second hand stores and online classifieds)- 2 wooden legs with square tops- 1"x 3" x 4' board- 3/4" plywood big enough to make your desk- 2 piano hinges- Whatever accessories you need to trick it out, I'll give you some suggestions belowSTEPSLet me start by saying that all armoires are different so the details on how you do this are going to change for your specific project. Take the basic concept and then adapt it as needed.Cut your desk top. You want to make sure that it can fit upright within you armoire. My armoire had built in cubbies on one side, so I cut the desk top to be a couple of inches narrower than the open half and a couple of inches shorter as well.Cut the 1" x 3" board to be the same width as the desk top.Now you need to figure out how tall to make your legs. As I mentioned in the materials list, you want to have an existing base or shelf that is desk height. If you don't, you'll have to add an extra step here and add a shelf to the armoire that will be the height you want your desk. Measure how high this is and cut your two legs to be the same height.Screw the board to the top of the legs.Attach the leg unit to the desk top so that the legs line up with the edge of the desk. Make sure the hinge is oriented so that the legs will fold flat onto the desk top.Before attaching the desk, make sure that you have a way for power get into the unit. If you're using an armoire that was originally used for a TV, it probably already has this. Mine was for clothes, so didn't, so I drilled a 1.5" hold into the back corner where the desk was going to attach.Now, use the second piano hinge to attach the desk/leg unit to the armoire, again, make sure that the hinge is set the right way. My desk fit snugly when folded so I didn't need any sort of latch. If yours doesn't, add a little screen door latch to the top to hold the folded desk in place.Now that the construction part is done, the fun part begins. First, I painted my armoire a Wedgwood blue on the outside and a muted green on the inside.I attached a power strip to the back and ran the cord through the hold I drilled.For the interior space, behind where the desk fits, I attached a water bottle lid with a 1/2" notch cut out of it on each side. From this I hung a 1/4" wooden dowel loaded with my ribbons and trim.To cover the back wall, I took a piece of foam core board, used spray glue to attach cork and then used spray glue again to attach a patterned fabric on top of the cork. I trimmed the fabric and folded the excess around to the back and glued the edges down. I then used pieces of velcro to attach it to the back of the armoire.I stacked small storage bins in each of the built in cubbies which already existed on the other half of the interior.On the inside of the right hand door I put a screw to hold a cutting matt. Below that I attached magnetic knife holders - one for bobbins and one for scissors.For the left hand door I made some spool racks. You can buy these ready to go, but I wanted mine an exact size so they wouldn't hit the pre-existing cubby walls when i closed the doors. I just took square wood plaques, hammered 3" nails about an inch into them in a grid. Once all the nails were in, I simple bent them at an angle and then painted the whole thing the same color as the cabinet. To hang them I put three stripes of double sided foam tape on the back and pressed them onto the door.And that's it! You can really customize this to be whatever you want for whatever you do. It really was easy and fun - perhaps one of my favorite projects to date!Enjoy.